

Lots of merchants often like to ask why my store conversion rate suddenly is getting worse and worse. I always like to say your store performance suddenly is going down dramatically. It often is not dealing with your faults in operation and marketing strategy. Don’t take it personally. Sometimes it’s just a very simple reason why the conversion rate is going down, although it was still very outstanding yesterday. It’s your competitor doing something impacting your customer’s final decision. You need a web application facilitating you to monitor them and agility react on the deployment.
In this chapter, I would introduce you to Flask and Heroku and utilize them to build a web application – Shopify Bot. I would take our chapter 10 – Shopify Product scraper for example. By the end of this chapter, you can learn how to build the programming files under the Flask framework and go live with the Shopify Bot using Heroku.
Table of Contents: Web Application Using Flask and Heroku
- What are Flask and Heroku
- 1 Structure plus 3 core Ingredients and components – Folder plus Html, CSS and App.py
- Test the Application in Local Host – Flask Run
- Install gunicorn, add Procfile & Requirement.txt
- Connect the Git with Heroku
- Full Version Script of the Shopify Bot Web Application
- SHOPIFY Latest Trending API Endpoint Recommendation
What are Flask and Heroku
Flask is a web framework, some people might also have known Django. They are very similar. It’s a Python module that lets you develop web applications easily. Flask has a small and easy-to-extend core. It does have many cool features like URL routing, and a template engine. It is a WSGI web app framework.
We walk you through how to build a Shopify bot fetching your competitor’s website data. You might have a question about how to build a web application and share it with others using this scraper. Flask is for the purpose of building a web application. Installing Flask on Mac is very easy, you just need to type pip3 install flask in the terminal. Meanwhile, Heroku is for the purpose of hosting the web application with a URL as a server role.
Heroku is a cloud service for hosting your applications, and the company was acquired by Salesforce in 2011. It is a Platform as a service or we call it PaaS with support for auto-scaling and deployment. It’s the fastest way to go from ideas to URLs. It supports multi-programming languages, such as Ruby, Php, Python, Java, Node.js, etc.
Below is the lighter version of the Shopify bot sponsored by Easy2Digital:
It primarily uses Git for deploying applications. There are some alternative options in the market such as Google App Engine, AppFog, Engine Yard, etc. It uses the application source received from git push to generate a language-specific build. Heroku uses its own lightweight Linux container called Dyno for running user-specified commands.
Creating a Heroku app account is for free, although it has a limited application creation quota. It’s enough already.
1 Structure plus 3 core Ingredients and components – Html, CSS, and App.py
Building a web application to publish is basically a web development project. So you need to have a website folder structure. It’s because the flask automatically detects the folder name by default, and you can name it so the flask can create the web URL paths. For example, templates host the index.html file you code for creating the front-end layout and elements.
The static folder hosts the CSS file which you use to design and decorate your application. Last but not least, the function and core engine of this web application is the app.py.
Shopify Bot HTML Section
As well as building a webpage, you need to create an HTML and add a header, and body section connecting with app.py and main.css.
In this Shopify bot, you need to have a form and submit button for users to input the Shopify store URL and submit and download all store product data. Based on these elements needed, above is the coding sample.
Shopify Bot main.CSS
In the static folder, you can create a main.CSS file. In the file, you can design your paragraph font family, color, web application background color, and image size. What’s more, designing a more engaging form and button.
App.py
First thing first, we need to import the flask modules except for the Shopify Bot modules
Then, we need to create a secret_key which is used to integrate with other 3rd party platforms such as Heroku, etc. You can randomly input the secret number as you like.
Last but not least, we need to create and name the app path by using @app.route (). Basically in this route, you can define the post or get method. And under this route, you can create a custom function as well. Here I use flash to deliver the messages based on the user’s action. And in the second path, I connect the function with our Shopify bot. Once the user downloads, it can activate the bot to fetch the specific store data and download it.
The core part of the Shopify bot python script is the same as the Python Tutorial 10. If you are interested, please check it out.
Chapter 10 – Build a Shopify Bot to Scrape Store Product Data in Bulk Using Easy2Digital APIs
Test the Application in Local Host – Flask Run
A staging test is indispensable before you upload to Github and activate in Heroku.
In the Mac terminal, you first locate where the web application is by using cd. Then you can input flask run and the terminal result comes up with a local host address, which you can use in the computer browser.
http://127.0.0.1:5000/ + the route name of returning index.html
Thus, you can test and modify it accordingly before the web application goes live.
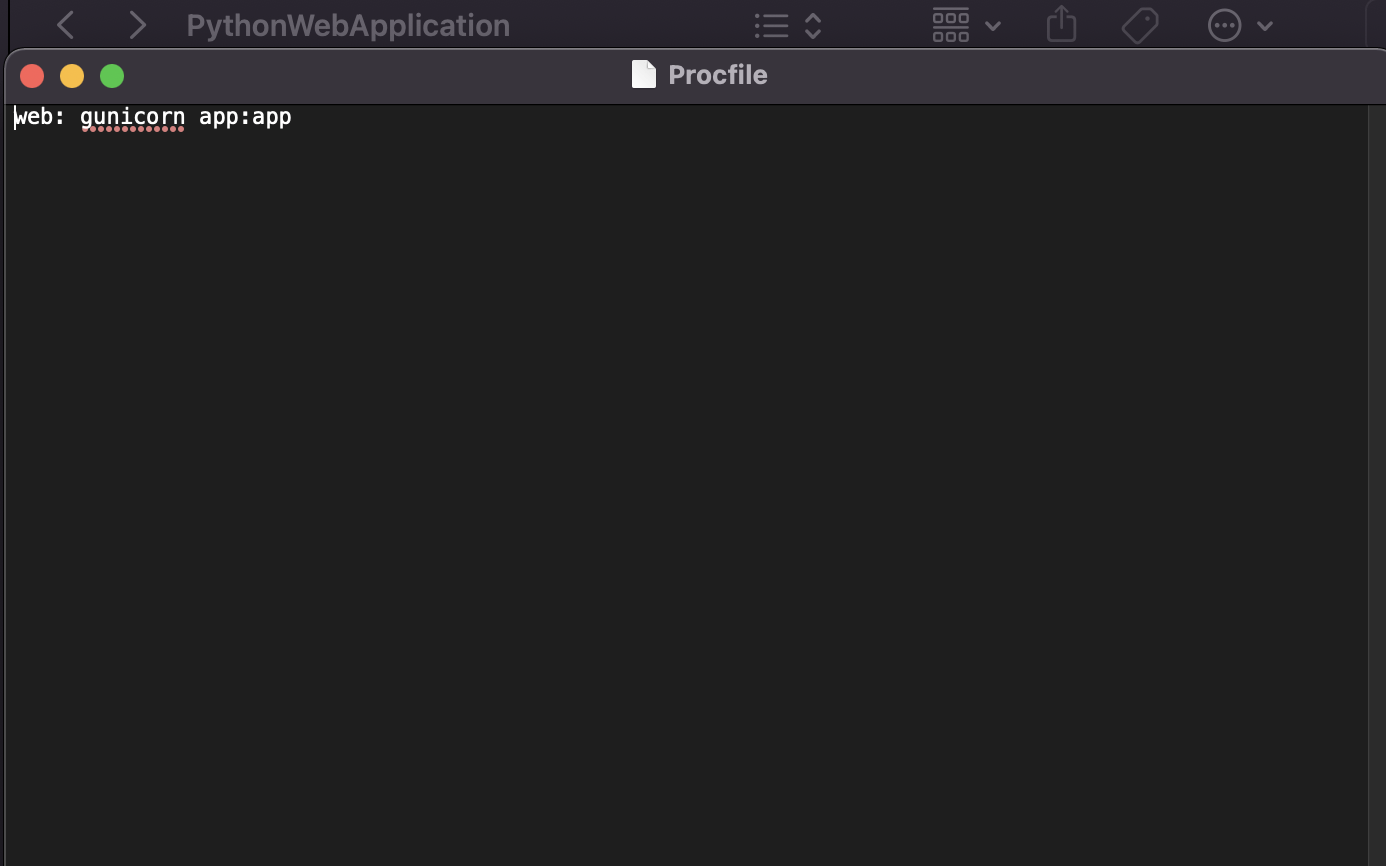
Install Gunicorn, Add Procfile and Requirement Files
Before going live with the web application, we need to add two additional file to the application. First thing first, you need to go back to the Mac terminal and cd the application path. Then, installing the gunicorn is by inputting pip3 install gunicorn.
Then, the first file you need to add is the Procfile. You need to input echo > Procfile, which is to add the Procfile in the group folder.
After this, there is one more thing you need to add to Procfile. It’s a line of codes. The purpose is to configure the Heroku Dynos.

The second file you need to add is the requirement file. It’s easy you just need to go back to the Mac terminal and input pip3 freeze > requirements.txt
Connect Git with Heroku
Till now, your web application is time to go live. It’s very simple to make it. First thing first, you need to go to your Heroku account and add a new app. Then, in the setting, you need to add the buildpack and use Python.
Last but not least, please go to Heroku and your app interface. Click the deploy and you can select to upload your application folders to Heroku Kit, or by connecting Github. The deployment method is up to you.
After things are ready, you have two options to deploy on Heroku, which are the automatic deployment and the manual deployment. I would recommend you start with the manual deploy at the first time connecting with your application.
Full Version Script of the Shopify Bot Web Application
If you would like to have the full version script of the Shopify Bot Web Application, please subscribe to our newsletter by adding the message Python Tutorial 26. We would send you the script immediately to your mailbox.
So easy, right? I hope you enjoy reading Python Tutorial 26: Create a Shopify Bot Web Application Using Flask and Heroku. If you did, please support us by doing one of the things listed below, because it always helps out our channel.
- Support and donate to our channel through PayPal (paypal.me/Easy2digital)
- Subscribe to my channel and turn on the notification bell Easy2Digital Youtube channel.
- Follow and like my page Easy2Digital Facebook page
- Share the article on your social network with the hashtag #easy2digital
- Buy products with Easy2Digital 10% OFF Discount code (Easy2DigitalNewBuyers2021)
- You sign up for our weekly newsletter to receive Easy2Digital latest articles, videos, and discount codes
- Subscribe to our monthly membership through Patreon to enjoy exclusive benefits (www.patreon.com/louisludigital)
FAQ:
Q1: What is Heroku?
A: Heroku is a cloud platform that allows developers to build, deploy, and scale applications easily.
Q2: What are the benefits of using Heroku?
A: Using Heroku offers several benefits such as simplified app deployment, automatic scaling, easy integration with other services, and a robust ecosystem of add-ons.
Q3: How does Heroku handle scaling?
A: Heroku automatically scales your application based on its traffic and usage. This ensures that your app can handle high load and provides a seamless experience for your users.
Q4: Can I use Heroku for hosting static websites?
A: Yes, Heroku can be used for hosting static websites. It provides a simple interface to deploy and manage static sites, making it an ideal choice for developers.
Q5: Is Heroku suitable for large-scale applications?
A: Yes, Heroku is suitable for large-scale applications. It offers features like horizontal scaling, load balancing, and performance monitoring to ensure your app can handle high traffic and scale effectively.
Q6: Does Heroku support multiple programming languages?
A: Yes, Heroku supports multiple programming languages including Ruby, Node.js, Java, Python, PHP, and more. You can choose the language that best suits your application.
Q7: What deployment options does Heroku offer?
A: Heroku offers various deployment options including Git-based deployment, container-based deployment using Docker, and integration with popular CI/CD tools like Travis CI and CircleCI.
Q8: Can I use a custom domain with Heroku?
A: Yes, you can use a custom domain with Heroku. It provides easy configuration options to link your app to a custom domain and manage DNS settings.
Q9: Does Heroku provide database services?
A: Yes, Heroku provides managed database services for popular databases like PostgreSQL, MySQL, and MongoDB. These services offer easy setup, scaling, and backups for your application’s data.
Q10: Is Heroku secure?
A: Yes, Heroku follows industry-standard security practices to ensure the safety of your applications and data. It provides features like SSL encryption, secure data transfer, and regular security updates.
Shopify API Endpoint Recommendation

Shopify Product Scraper API
Price: US$5
Scrape products information from any webshop built by using Shopify platform. Product scraping is up to 500 SKUs. 15+ product data metrics are included in the scraped result that include pricing, date_created, product name, etc. And Support to scrape ether top domain or subdomain shopify webshop domain
More API options from the Shopify collection.