
For Web3.0 smart contract developers, Brownies makes your life much easier to develop, import, test, and debug smart contracts deployed on the Ethereum blockchain network. Moreover, it facilitates you to set up transactions, methods, and variables to interact with Ethereum.
Since that, I will go through basic knowledge regarding Brownie and expand on how to use Brownie to develop Ethereum smart contracts and deploy them onto the blockchain network.
Brownie Web3.0 – Ingredients to Develop Ethereum Smart Contracts Interacting with Cryptocurrency Network
Brownie, Python, Infura, os, Ganache, MetaMask, ETH Goerli test network
Table of Content
- What’s Brownie
- Activate Brownie and Install Ganache Local Blockchain Installation
- Create the 1st smart contract and deploy it onto Ganache CLI
- Add a new account and Connet to the real test Network
- Test and Debug your smart contracts
- Brownie Console for any Adhoc function test and development
- Full Python script of Brownie Web3.0 – Develop Smart Contracts and Activate Interaction with ETH Using Brownie and Python
- FAQ
What’s Brownie
Brownie is a friendly and easy-to-use framework for developing Ethereum smart contracts. The main value from its scope of functions has 3 aspects:
Deploy the smart contracts needed on blockchain networks
Create different types and purposes of smart contracts and deploy them onto the blockchain such as Ethereum.. And you can create and initiate any transactional elements that matter in the interaction with the blockchain.
Interact with the smart contracts
Brownie framework and folder path facilitate you to write scripts or use the Brownie console to interact with the smart contracts deployed on the main net. Or you can implement UAT in a local blockchain environment, e.g: Ganache
Test the smart contracts under development
Brownie provides a quick, friendly, and easy-to-use smart contract development testing environment and those related functions to implement the test. For example, you can get detailed information when a transaction reverts to help you pinpoint the issue quickly.
Activate Brownie and Install Ganache Local Blockchain Installation
Step1: Brownie Installation
Take the MacOS environment for example. First thing first, we need to install a visual environment for Brownie by typing in the line of codes as follows in the terminal.
Python3 -m pip install –user pipxPython3 -m pipx ensure pathAfter installation is done, be sure to close the terminal to avoid conflict or activate the visual environment.
Then, please type in the line of codes as follows to install Brownie
Pips install eth-brownieTo check if you have installed it on your Mac, we can type in the checker command, which is the same as any other package check.
Step 2: Create the first Brownie script folder and project
I assume you have created a new folder in your coding software, e.g: visual studio code. Now we can try to create a new brownie project. Here is the code for initiation as follows:
Brownie initOnce the initiation is done, as well as react installation, the Brownie folder comes up with a list of folders by default. They are the folders that have different functions as follows:
- Build
- Contracts
- Interfaces
- Reports
- Scripts
- Tests
Step 3: Install Local Ganache Cli
Brownie by default works with the Ganache CLI in the terminal, which is a local blockchain visual environment. In our previous article, the script directly connects to the web UI version. This time requires us to install Ganache CLI.
- Download
node.js(Here is the macOS version) and Install it on the device - Command:
npm install –global yarn. We need to Install yarn, which is a package manager that actually allows us to download pieces and packages like the Ganache CLI. Be sure to addsudoif your device might respond you don’t have permission to install yarn. - Install Ganache CLI by using the commands:
yarn global add ganache-cli. Again, be sure to addsudoif your device rejects again.
Create the 1st smart contract and deploy it onto Ganache CLI
Add the smart contract
In Brownie’s contract folders, it is for you to save the smart contract file, such as easy2digitalStore.sol. After you add the file under this folder, you can input this line of code as follows:
Brownie compileOnce you compile the given sol file, you can see all the compiled information saved under the build folder in the contract folder as a JSON format.
Deploy on the ETH Blockchain
First thing first, we need to create a new Python file under the script folder
Deployment.pyIn the script, we need to use one brownie’s method which is the accou. nts(), which it’s for interacting with the local visual blockchain, Ganache CLI. Here are the code samples follows:
Import brownie import accountsdef single_contract():localGanacheAccount = accounts[0]print(localGanacheAccount)Def main():single_contracct()And we can use the brownie run to activate the python script in the terminal.

Add a new account and connect to the real test Network
We can create a new account instead of using the Ganache CLI one. Here are both the command and the code as follows:
In terminal:
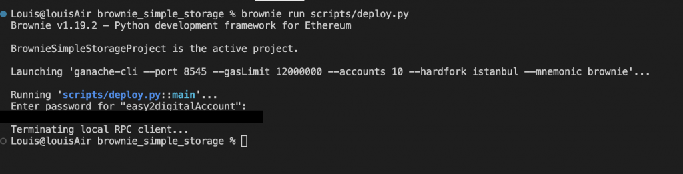
Brownie accounts new easy2digitalAccount-accountThen, you need to add a private key for this new account. We can copy the MetaMask private key and paste it here.
Last but not least, Brownie would encrypt your private key using a password. Thus, just input a password as you like.
If you try to run using the load method to look up the new account you create just now, it will look like this result as follows:
Connect to a real test network
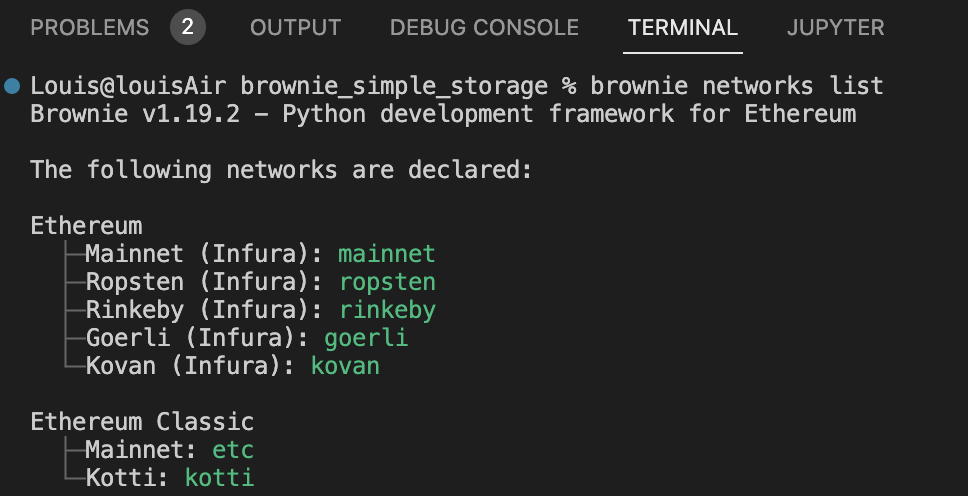
Brownie provides a list of networks declared. If you like to check, just input the command brownie networks list in the terminal.
In the previous article, we used Infura as a 3rd party platform to connect to Ethereum. So here we would use INFURA as well.
First thing first, we need an HTTP provider protocol from INFURA. In Brownie, we have a method to connect with Infura. Please add this to the .env
WEB3_INFURA_PROJECT_ID = your infura http endpoint unique ID.Then, instead of getting the account from Ganache CLI, now we need to get the account from your MetaMask goerli test network.
Add the private key you wish to add, such as MetaMask wallet. Be sure to add the 0x before the MetaMask private key. Here we need to do three things
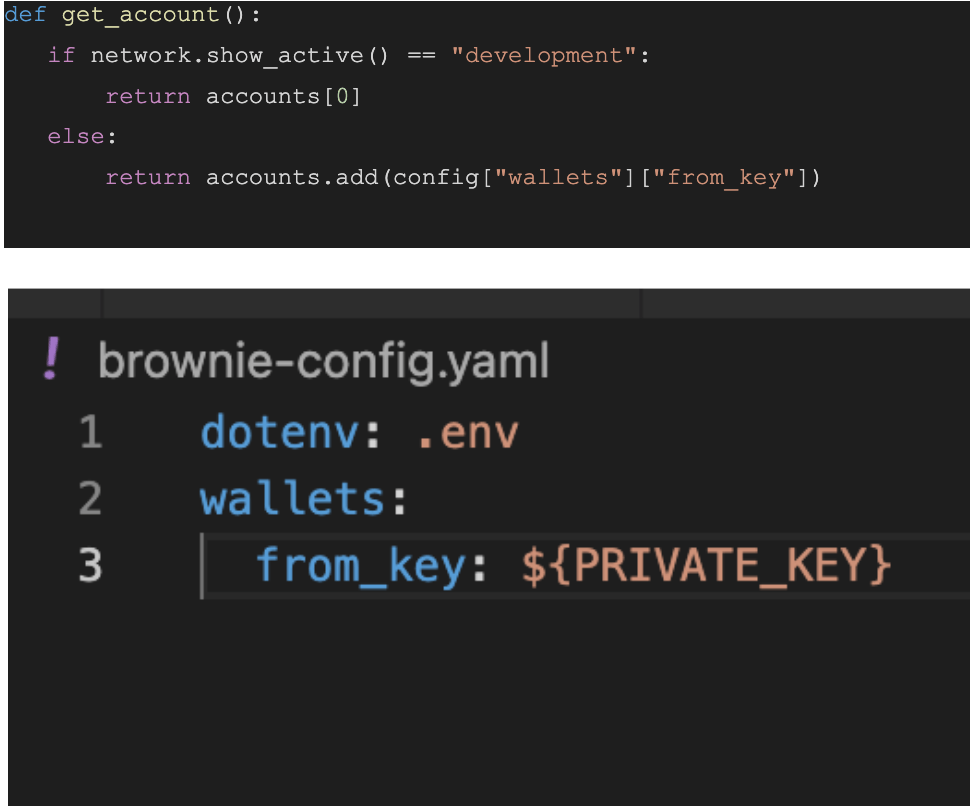
- Create a get_account function which is to fetch the MetaMask wallet private key info
- Add the
brownie-config.yamlfile in the main directory folder to connect with .env which includes the private key and INFURA endpoint unique ID - Replace account[0] with get_account() in the Ganache Cli testing script.
Lastly, we need to tell Infura which ETH test network the python script will use. As we used goerili in the previous article, here use the same one by inputting the command in the terminal
Brownie run scripts/deployment.py –network goerliOnce it’s connected, you can go to the deployment section under the build folder, there is a map JSON file generated.
Test and Debug your smart contracts
One of the powerful features of Brownie must be the testing environment. Smart contract developers can implement the UAT and fix the bugs before going live.
Let us create a script just as well as the deployment.py script we created in the test folder.
First thing first, Brownie is super convenient because it can allow developers directly import the smart contract into the python script.
Here is the code sample:
From brownie import easy2idigitalContract, accountsSo we can directly use the contract name with deploy() method to deploy the account on a blockchain. For example:
Def test_deployment():##Arrange a specific smart contract addresswalletAccount = accounts[0]##Deploy the contract to the accountSingle_contract = easy2idigitalContract.deploy({“from”: walletAccount})Starting_value = single_contract.retrieve()Secondly, as it is a test, we need to check if the value retrieved is equal to the expected value that it should be. So here is the sample of codes as follows:
Expected == 0Assert starting_value == expectedThen, please input the command in the terminal to see if the value is equal. If the result is passed, it will show passed in the green color.
Brownie test
Brownie Console for any Adhoc function test and development
For the script testing, if you like to create a shell or console to test and run the script. You can try to input the code as follows, where you can directly update the script, and print it out to get the result immediately.
Brownie test –pdb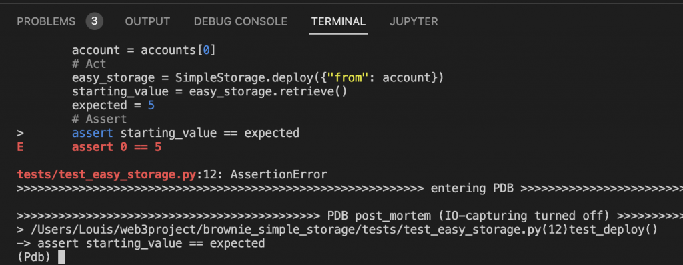
Full Python script of Brownie Web3.0 – Develop Smart Contracts and Activate Interaction with ETH Using Brownie and Python
If you are interested in Web3.0 tutorial 3 – Brownie in Web3.0 – Develop Ethereum Smart Contracts Interacting with Cryptocurrency Network Using Brownie and Python, please subscribe to our newsletter by adding the message “Web3.0 tutorial 3”. We would send you the script immediately to your mailbox.
I hope you enjoy reading Web3.0 tutorial 3 – Brownie in Web3.0 – Develop Ethereum Smart Contracts Interacting with Cryptocurrency Network Using Brownie and Python If you did, please support us by doing one of the things listed below, because it always helps out our channel.
- Support and donate to my channel through PayPal (paypal.me/Easy2digital)
- Subscribe to my channel and turn on the notification bell Easy2Digital Youtube channel.
- Follow and like my page Easy2Digital Facebook page
- Share the article on your social network with the hashtag #easy2digital
- You sign up for our weekly newsletter to receive Easy2Digital latest articles, videos, and discount codes
- Subscribe to our monthly membership through Patreon to enjoy exclusive benefits (www.patreon.com/louisludigital)
