
For Web3.0 smart contract development, testing or UAT is one of the most important processes before the smart contract lives on the real Blockchain network. Thus, I am going to explore how to develop a script using Python and Ganache and build a smart contract testing the local environment.
Ingredients to build Web3 smart contracts deployed on a local visual Ethereum blockchain Using Ganache and Python
Python3, Ganache, Solcx, Solidity, Web3, Json, os, dotenv
Agenda
- Install Solcx and Jsonify your Solidity File
- Bytecode and ABI
- Install Web3 Module and Connect to Ganache
- Hide Cryptocurrency wallet private key
- Create a smart contract on the Ethereum blockchain
- Activate Transaction Functions – Build, Sign, Send & Confirm a Transaction
- Add Specific Value and Update the contract
- Full Python Script of Web3 Smart Contract Connecting to Ganache
- FAQ
Web3 Smart Contract – Install Solcx and Jsonify your Solidity File
First thing first, the script requires a language to implement smart contracts on blockchain platforms, such as the most notable Ethereum. For the language, I use Solidity and would share more details in the other upcoming article.
In terms of Solidity, we can use Solcx to compile the smart contract dataset in a Python development environment. Python wrapper and version management tool for the Solc Solidity compiler.
If you like to have the Solidity file easy2digital.sol for this article,
Step 1. Install Solcx, Open and Compile your Solidity file in the Python script
Take Mac for an example. Here is the Solcx installation in the terminal as follows:
pip install py-solc-xThen, we need to import Solcx and a required method in the Python script
From solcx import compile_standardWith open(“./your solidity file name.sol”, “r”) as file: Single_contract_file = file.read()Lastly, we need to use the method compile_standard to compile the sol file information into a variable
compiled_sol = compile_standard({
 "language": "Solidity",
 "sources": {"your file name.sol": {"content": ;single_contract_file}},
 "settings": {
 "outputSelection": {
 "*": {"*": ["abi", "metadata", "evm.bytecode", "evm.sourceMap"]}
 }
 },
 },
 solc_version="0.8.7",
)
Step 2. Jsonify the compiled file
For being more convenient to fetch the file data and interact with the blockchain network and transactions, we can jsonify the compiled data into a json data format. Here is the code as follows:
with open("compiled_solCode.json", "w") as file:
 json.dump(compiled_sol, file)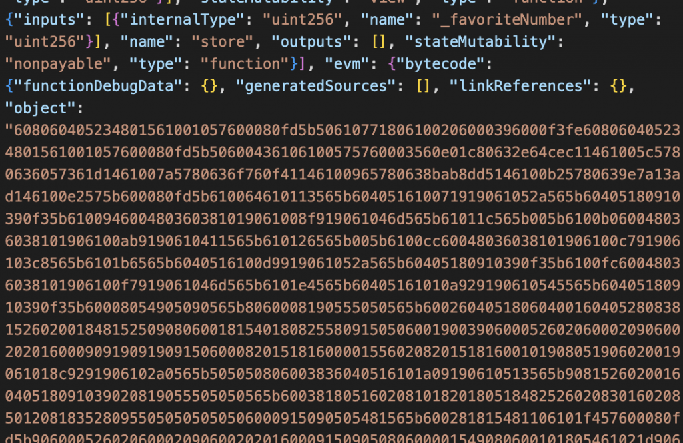
Web3 Smart Contract – Bytecode and ABI
ABI and Bytecode information are both critical to interact with the Ethereum blockchain network and control computer communication.
Bytecode
Bytecode is the information that contains instructions to the computer in binary. Every line of code that is written gets broken down into opcodes so that the computer knows exactly what to do when running our code.
In the Ethereum world, the bytecode is actually what gets deployed to the Ethereum blockchain. When we deploy to an Ethereum network and confirm the transaction using a browser-based wallet like Metamask, we can actually see the bytecode that gets deployed.
# Get Bytecode
Bytecode = compiled_sol['contracts']['easy2digital.sol']['SingleContract']["evm"]["bytecode"]["object"]
ABI
ABI is the application binary interface. It defines the methods and variables that are available in a smart contract and which we can use to interact with that smart contract. Since smart contracts are converted into bytecode before they get deployed to the blockchain, we need a way to know what operations and interactions we can initiate with them.
Then we need a standardized way to express those interfaces so that any programming language can be used to interact with smart contracts.
Your application can interact with a smart contract using any coding language as long as you have the ABI for that smart contract and a library to help you communicate with any one node to give you an entry point into the Ethereum network.
Here is the code to generate the ABI value in easy2digital.sol as follows:
# Get ABI
getABI = compiled_sol['contracts']['SimpleStorage.sol']['SimpleStorage']['abi']
Install Web3 Module and Connect to Ganache
When Bytecode and ABI used for fetching the methods and variables in the smart contract complied file are ready, it’s time to install a module for Ethereum interaction. It’s called the Web3 module in Python
In the terminal, we input this command as follows:
pip install web3In the Python script, please input the module using the code as well
from web3 import Web3Ganache
Then, for developing a Web3 smart contract tes. ting environment, we need a visual Ethereum blockchain rather than connecting to the real one through Metamask. So here we need software called Ganache.
Ganache facilitates Web3 developers because it provides you with a personal Ethereum blockchain which you can use to run tests, execute commands, and inspect state while controlling how the chain operates.
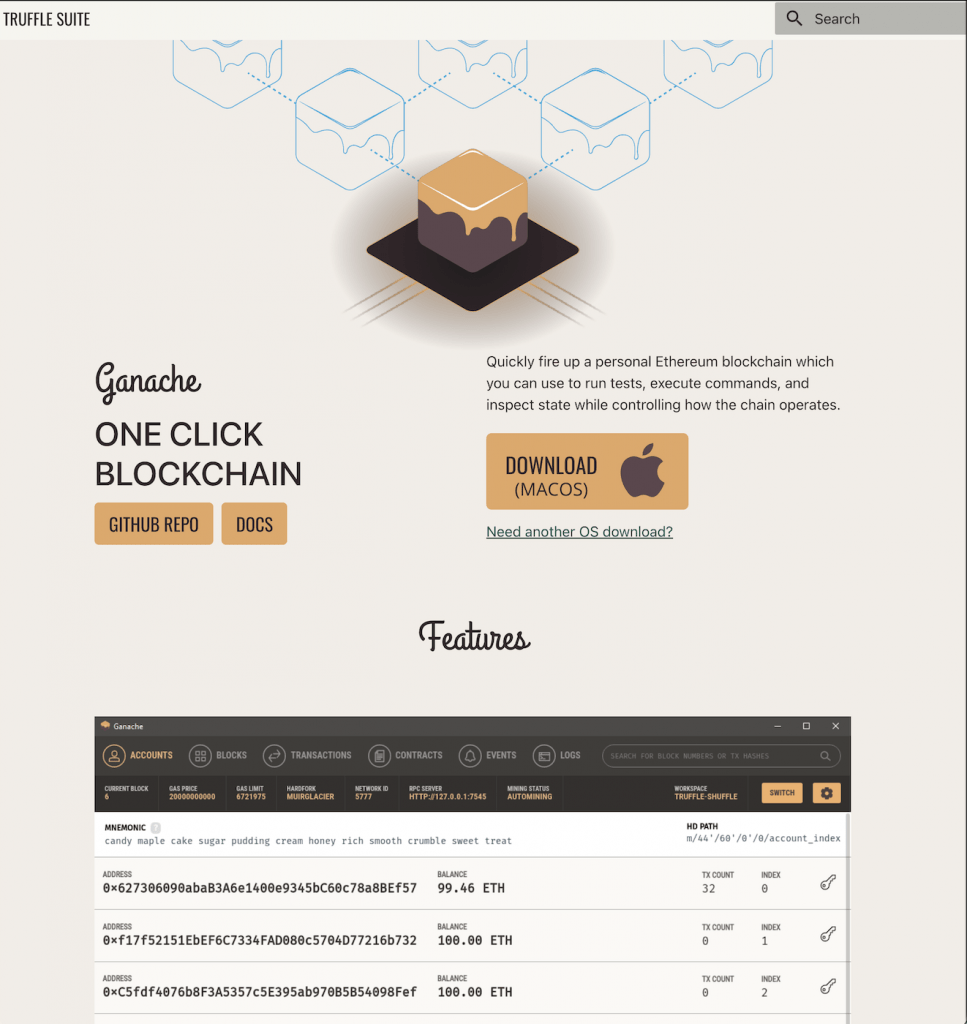
The installation method is super easy. Afterward, you can open a quick Ethereum and open the visual ETH network dashboard. On the dashboard, there are several elements that are necessary to use on the Python script. Here is the list of items as follows:
- HTTP URL
- Chain ID
- The visual crypto wallet address
- The wallet private key
For the chain ID, Ganache sometimes might have bugs and your unique ID might not work. If this case happens to you, please try 1337 chain id.
Then, here are the codes for using the Web3 module connecting to Ganache.
w3 = Web3(Web3.HTTPProvider("your ganache HTTP URL"))
gasPrice = w3.eth.gas_price
chain_id = "your ganache chain id"
my_address = "select a key and copy and paste the address here"
Hide the cryptocurrency wallet private key
In fact, Ganache simulates an environment connecting your Web3 with a real Ethereum blockchain. Take Metamask for example, the address is equal to the real wallet address and the private key is the real wallet private key. Nevertheless, you don’t want to disclose your private key on the server because it’s risky losing all your funds.
So in the DApp or Web3, we need to hide the private key in the Python script. Here we would use .env and gitignore.
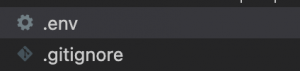
First thing first, we need to create an.env file and put it in the same folder as the Python script.
Here is the code in the env file:
export PRIVATE_KEY="0x + your private key"Secondly, please add an .gitinore file in the same folder as well
Last but not least, we can import os, dotenv and use getenv() method to call the variable in the env file
import os
from dotenv import load_dotenv
private_key = os.getenv("PRIVATE_KEY")Create a smart contract on the Ethereum blockchain
As mentioned earlier, we have used Solidity to write a smart contract logic. Thus, the question is how to deploy this logic on the blockchain. Web3 module provides contract() and facilitates us to complete the procedure.
singleContractA = w3.eth.contract(abi=getABI, bytecode=Bytecode)If you like to generate the transaction count ID, we can use getTransactionCount()
nonceA = w3.eth.getTransactionCount(my_address)Activate transaction functions – Build, Sign, Send and Confirm a transaction
The core value of Web3.0 is decentralized transaction and payment processing. From now on, as long as both your business and customers are willing to deal using Cryptocurrency, you both don’t need to go through the traditional bank system. That implies and means a lot!
Thus, one of the key parts of interacting with blockchain is building up a transaction flow. No matter what kinds of business or transaction you usually do, basically there are four basic steps, which are as follows:
# Build a transaction
transactionA = singleContractA.constructor().buildTransaction(
{"gasPrice": gasPrice, "chainId": int(chain_id), "from": my_address, "nonce": nonceA})
# Sign a transaction
signedTransaction = w3.eth.account.sign_transaction(
transactionA, private_key=private_key)
# Send a transact. ion
transactionHash = w3.eth.send_raw_transaction(signedTransaction.rawTransaction)
# Wait for the pending and confirmed transaction response
transactionReceipt = w3.eth.wait_for_transaction_receipt(transactionHash)Add Specific Value and Update the contract
Furthermore, you also can update the existing transaction and add specific value as well.
singleContractB = w3.eth.contract(
address=transactionReceipt.contractAddress, abi=getABI)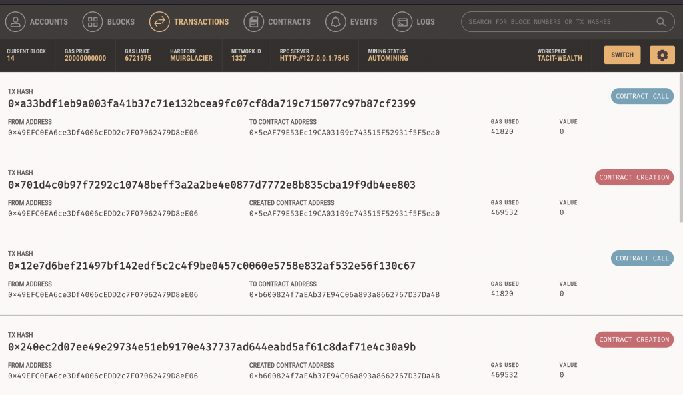
print("Updating the contract.....")
contractTransaction = singleContractB.functions.store(75).buildTransaction(
{"gasPrice": gasPrice, "chainId": int(chain_id), "from": my_address, "nonce": nonceA + 1})
signedcontractTransaction = w3.eth.account.sign_transaction(
contractTransaction, private_key=private_key)
# Send the transaction
print("Deploying the contract.....")
sendcontractTransaction = w3.eth.send_raw_transaction(signedcontractTransaction.rawTransaction)
# Wait for the pending and confirmed transaction response
print("Deployed!!!")
transactionReceipt = w3.eth.wait_for_transaction_receipt(sendcontractTransaction)
print(singleContractB.functions.retrieve().call())
Full Python Script of Web3 Smart Contract Connecting to Ganache
If you are interested in Web3.0 tutorial 1 – the Connect Web3 Smart Contracts to Ganache Using Python For Developing and Testing DApp, please subscribe to our newsletter by adding the message “Web3.0 tutorial 1”. We would send you the script immediately to your mailbox.
I hope you enjoy reading Web3.0 tutorial 1 – the Connect Web3 Smart Contracts to Ganache Using Python For Developing and Testing DApp. If you did, please support us by doing one of the things listed below, because it always helps out our channel.
- Support and donate to my channel through PayPal (paypal.me/Easy2digital)
- Subscribe to my channel and turn on the notification bell Easy2Digital Youtube channel.
- Follow and like my page Easy2Digital Facebook page
- Share the article on your social network with the hashtag #easy2digital
- You sign up for our weekly newsletter to receive Easy2Digital latest articles, videos, and discount codes
- Subscribe to our monthly membership through Patreon to enjoy exclusive benefits (www.patreon.com/louisludigital)